I was given some seedlings from the Inspire Collective Meet up. And the herbs given were eager to be planted out. Here is the making of the wicking bed 3 for the herbs
Below shows how well the wicking bed been going on day 117.
Do not plant the mint in the soil/ground directly! It took over my whole bed and I had to put it in a pot in the bed.

Day 117: Here is a look at how well the wicking bed is going 😀
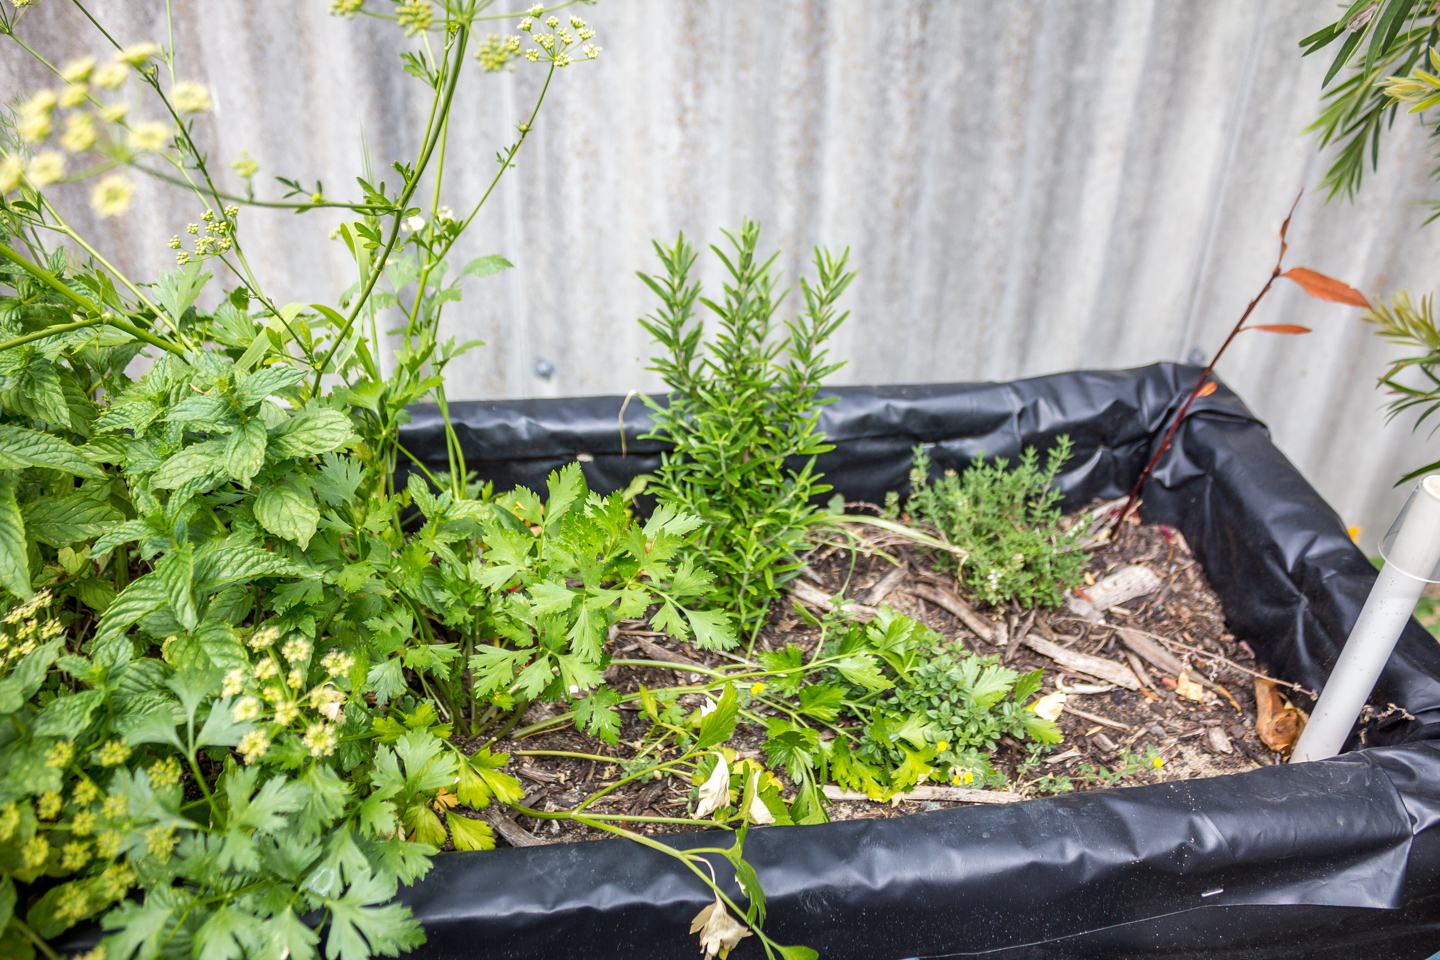
Day 117: Here is a look at how well the wicking bed is going 😀
Enjoy,
Grace-yi
![19/09/15 Day 28 [Day 2 of the project]: The Final Wicking Bed 3 Herb 14](http://designofgrace.com/wp-content/uploads/2016/01/190915-Wicking-Bed-3-Herb-14.jpg)

Day 1: Brought the box, carpet and black plastic to mum and dads to get the project going on a Saturday.
Day 1: Close up of the carpet and black plastic layer and me taking a break
I use the stapler gun to attach the carpet to the box and will be doing the same for the black plastic
![19/09/15 Day 28 [Day 2 of the project] One thing I love about making wicking beds is that we can do it in stages and when we have the time to do it. We re-used chairs from the verge to use as the stands Make sure it is balanced](http://designofgrace.com/wp-content/uploads/2016/01/190915-Wicking-Bed-3-Herb-04.jpg)
Day 28 [Day 2 of the project]
One thing I love about making wicking beds is that we can do it in stages and when we have the time to do it.
We re-used chairs from the verge to use as the stands
Make sure it is balanced
![19/09/15 Day 28 [Day 2 of the project]: Close up of the lever bubble](http://designofgrace.com/wp-content/uploads/2016/01/190915-Wicking-Bed-3-Herb-05.jpg)
Day 28 [Day 2 of the project]: Close up of the lever bubble
![19/09/15 Day 28 [Day 2 of the project]: Once levelled, add in the pea gravel to about the diameter of the pipe.](http://designofgrace.com/wp-content/uploads/2016/01/190915-Wicking-Bed-3-Herb-06.jpg)
Day 28 [Day 2 of the project]: Once levelled, add in the pea gravel to about the diameter of the pipe.
![19/09/15 Day 28 [Day 2 of the project]: Drill a hole between the pea gravel reservoir layer and the soil layer](http://designofgrace.com/wp-content/uploads/2016/01/190915-Wicking-Bed-3-Herb-07.jpg)
Day 28 [Day 2 of the project]: Drill a hole between the pea gravel reservoir layer and the soil layer
![19/09/15 Day 28 [Day 2 of the project]: We decided to use wheat stalks as we didn't have any shade cloth.](http://designofgrace.com/wp-content/uploads/2016/01/190915-Wicking-Bed-3-Herb-08.jpg)
Day 28 [Day 2 of the project]: We decided to use wheat stalks as we didn’t have any shade cloth.
![19/09/15 Day 28 [Day 2 of the project]: Now my herb seedlings have a new home This is a Chive](http://designofgrace.com/wp-content/uploads/2016/01/190915-Wicking-Bed-3-Herb-09.jpg)
Day 28 [Day 2 of the project]: Now my herb seedlings have a new home
This is a Chive
![19/09/15 Day 28 [Day 2 of the project]: Now my herb seedlings have a new home This is a Coriander](http://designofgrace.com/wp-content/uploads/2016/01/190915-Wicking-Bed-3-Herb-10.jpg)
Day 28 [Day 2 of the project]: Now my herb seedlings have a new home
This is a Coriander
![19/09/15 Day 28 [Day 2 of the project]: Now my herb seedlings have a new home This is a Oregino](http://designofgrace.com/wp-content/uploads/2016/01/190915-Wicking-Bed-3-Herb-11.jpg)
Day 28 [Day 2 of the project]: Now my herb seedlings have a new home
This is a oregano
![19/09/15 Day 28 [Day 2 of the project]: Now my herb seedlings have a new home This is a Mint](http://designofgrace.com/wp-content/uploads/2016/01/190915-Wicking-Bed-3-Herb-12.jpg)
Day 28 [Day 2 of the project]: Now my herb seedlings have a new home
This is a Mint
![19/09/15 Day 28 [Day 2 of the project]: Now my herb seedlings have a new home This is a Parsley](http://designofgrace.com/wp-content/uploads/2016/01/190915-Wicking-Bed-3-Herb-13.jpg)
Day 28 [Day 2 of the project]: Now my herb seedlings have a new home
This is a Parsley